Photographing Dall Sheep In Alaska By Jerry Herrod

dall sheep, hunting, Hunting Alaska, photography

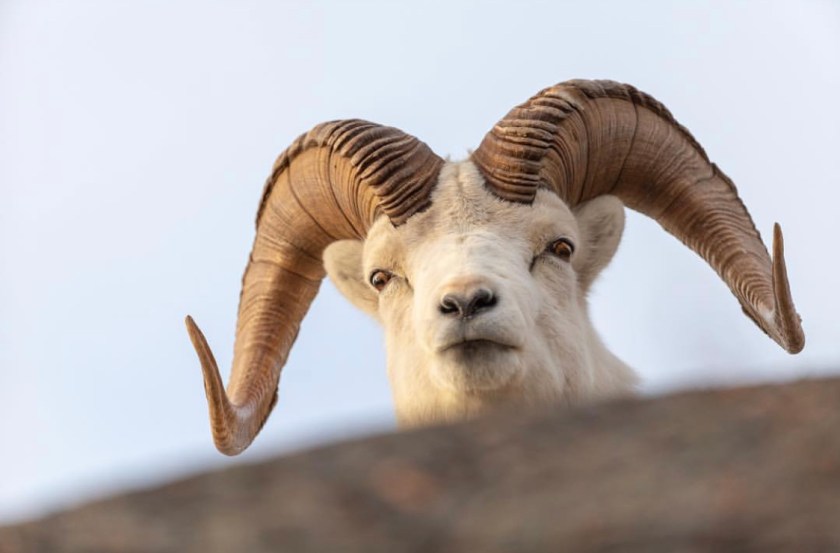
Dall Sheep photography in Alaska can require as much effort as it takes to harvest a full curl Ram during the Sheep Season or be as pleasant as driving down the road and finding them close enough to shoot from the comfort of your vehicle with a smaller telephoto zoom lens. 

Twister

While not for everyone, the Dall Sheep is an important animal to add to any Alaska photographers portfolio and if you’re a true sheep nut at heart, it’s also a good way to keep track of population trends and horn growth if you spend enough time in a certain area. 

Hierarchy

If you’re already a mountain hunter, you’ve probably already collected most of the outdoor gear necessary to hit the mountains and start looking for sheep, minus a camera and/or lenses. If you aren’t, you’ll want quality gear and clothing to help keep you warm and safe on a outing in the mountains. 

Dressing in appropriate layers for warmth and and quality raingear is a necessity in the mountains, along with trekking poles and quality hiking boots designed for alpine walking. Dress for the season and dress in layers. You can shed or put back on multiple lighter layers and control your body temperature better than wearing only one bulky set of insulated pants and jacket. The more active you are, the more layers you can shed and when you stop to photograph for longer periods you can put those extra layers back on to stay warm. 

A good set of binoculars ranging from 8×32 up through 10×42 are more than sufficient to help with spotting Sheep from a distance and analyzing their behavior. 

Sheep are like any other wild animal and are constantly aware of their surroundings and anything not natural to the terrain. At the same time each Sheep is an individual animal and certain animals tolerate a photographer getting into position for a shot more than others. It’s all in how you approach to get within range of the lens you’re using. I would recommend learning Dall Sheep behavior from a biological and conservationist standpoint before trying to spend a lot of time climbing and trying to get within photo range of sheep. Learning animal behavior before heading into the field will help prepare you to get the photo you’re looking for. Many resources are available with some internet searching from the Alaska Department of Fish and Game, US Fish & Wildlife Service and reading up on what professional photographers have published and made available in books or online. 

Approach to mountain animals such as sheep requires time, patience and being physically capable of climbing to where the animals will be. It’s no small feat and the trip to and from your location to shoot may require most of your day just to get there and back leaving as little as a few hours to collect images. 

Any camera is capable of collecting an image nowadays, even the camera in your smart phone but much of the basic camera gear available might require you to get too close to the animals and just pushing them out of the country totally. You’ll be left sitting watching sheep running for the next mountain over and just spending the rest of the day hiking down a mountain with nothing to show for all your effort and climbing. 

Getting serious about photographing mountain animals such as sheep or goats or any animal that lives above treeline often requires more specialized camera gear. Quality camera gear is often expensive but, you can often find big telephoto lenses used and substantially cheaper than their newer counterparts. 

I shoot on a Canon camera and lenses but it comes down to personal preference and ease of use for the individual. Many people get wrapped around the axles on high end photography gear for wildlife photography and having the latest and greatest gear (sound familiar with you sheep hunting nuts out there?).  For example, with some time spent on a internet search or occasionally checking the local camera shop, you might find a used 100-400mm zoom lens and a quality DSLR body for under $2,000.00. That along with a small tripod for stability, a high speed SD memory card and a few extra batteries and you’ve got a reasonably good walk-about wildlife photography kit that will cover most of what you’ll want to shoot and allow you to stay reasonably safe distances from the wildlife you’re trying to photograph. 

More advanced gear may consist of a kit comprised of a 500mm or 600mm supertelephoto prime lens, large carbon fiber tripod and extended battery grip to allow for longer sessions before changing batteries. The larger lenses are heavy, and photo gear can quickly weigh as much as what you might take for a week long expedition hike in the mountains. 

If you already have a handle on basic digital photography, understanding of exposure, aperture and light, I could suggest some camera gear based on experiences in the field. I won’t dive into specifics on each brand for now, but Nikon and Canon are two of the more well known manufacturers. 

Keeping one eye open always

Keep in mind that each company produces entry level lenses and higher end lenses that are specific to entry level camera bodies,mid-range and pro-grade camera bodies. Do your research before you buy and ensure that the lens you’re getting is compatible with the camera body you’re buying it for. 

This list isn’t exclusive and some lenses have been left out. Some popular wildlife lenses for collecting longer range images are;

Canon 70-200mm f4 zoom

Canon 70-300mm f4-f5.6 zoom

Canon 100-400mm f4.5-f5.6 zoom

Canon 400mm f4 prime 

Canon 400mm f5.6 prime

Canon 500mm f4 prime

Canon 600mm f4 prime

Nikon 70-200mm f4 zoom

Nikon 70-300mm f4.5-f5.6 zoom

Nikon 80-400mm f4.5-f5.6 zoom

Nikon 200-500mm f5.6 zoom

Nikon 400mm f2.8 prime

Nikon 500mm f5.6 prime

Nikon 600mm f4 prime

Sigma 150-600mm f5-f6.3 zoom (produced by Sigma for both Canon and Nikon)

Tamron 150-600mm f5-f6.3 zoom (produced by Tamron for both Canon and Nikon)

With the zoom lenses you’ll be able to have a greater range and style of images to collect versus a large heavy prime lens glass. The prime lenses are big, cumbersome and not something most people are going to want to carry for several miles of hiking, especially in uneven and up and down terrain you’ll find hiking along steep slopes and hillsides on the mountains. Add a tripod large enough to support a ten pound prime lens and DSLR body and it becomes very cumbersome very quickly. A zoom lens will allow for a lot of versatility and allow for portrait style shots as well as collecting a landscape style environmental shot with an animal. With the large prime lenses you’re relegated to having to walking closer to, or further away, from your subject to frame the image properly for the shot. Just a few things to think about when you are deciding on if which wildlife lense you’re going to buy. Some people will prefer versatility of the zoom lens while others might be more confortable with the prime lenses and shooting from a tripod further away from the subject they are photographing. 

Tripods- Tripods will help you get a more stable shot with no operator introduced camera shake. The modern zoom lenses have amazing image stabilization built in but you wont be able to hold the camera and lens as steady as if you would be shooting from a tripod to support your kit.  I would recommend a carbon fiber tripod with a rating to hold the weight of your camera body and lens kit. The last thing you’ll want is a tripod too light for the kit you’re using and not being stable enough to prevent minor vibrations that might affect your image quality. Some quality tripods are produced by Gitzo, Manfrotto, Pro Media Gear, Sirui and Really Right Stuff. Whatever tripod you buy, I would recommend one that allows you to fold the legs out flat so you can allow yourself to lay down prone on the ground and photography from a low position of you need to. Mountain terrain is uneven and you might set up a tripod for taking a photo from a standing, kneeling or laying down position. 

Tripod Heads- There are many heads available for mounting the camera or lens to your tripod. Some are designed more specifically for wildlife such as gimbal heads, that allow you to more easily track and move with the wildlife subject. Ball heads can work just as well but may not track a moving subject as easily, but are often times less cumbersome than the gimbal head. Like with the cameras and lenses, it comes down to personal preference and ease of use.  

If you find yourself in a roadside situation and photographing from your vehicle, you might consider a photography bean bag to rest your camera on while setting your lens out your window. It will allow you to have a stable and even rest for your lens. 

Quality gear can cost as much or as little as you want to spend depending on if you’re buying it new or used. Don’t be afraid to buy used camera gear since many people are often upgrading gear as soon as the next new model camera body or lens is released and the savings is passed on to you when you buy used. Most photographers take reasonably good care of their gear and you might find a diamond in the rough if you take some time searching for gear and doing your homework.The accessory gear is also often found used and reasonable priced. Some internet searching can come up with quality used tripods and tripod heads for wildlife photography. 

I won’t be able to give specific locations on where to go, but most of the mountain ranges in Alaska hold Dall Sheep and with a some hiking and climbing you can get to some amazing places you may not have seen otherwise. The landscape alone and the views you’ll see is just as amazing as seeing the grand animals of the mountains. There’s a lot of Alaska out there to experience. 

2016 Alaska Dall Sheep Hunt “Mountain Memories”

alaska, alaska hunting expedition, big game hunting, DIY hunting, extreme hunting, Field Producer, game processing, hunting, Hunting Culture, Hunting with Camera, meat, nature, public land, unguided hunting, wild game, wildlife

Follow along with team members and brothers Austin & Auggie as they go after Dall Sheep in Alaska’s rugged backcountry.


Late Season Kodiak Sitka Blacktail Hunt “Thanksgiving Day Magic” Part 1/2

alaska, alaska hunting expedition, Blacktail Deer, Deer Hunting, DIY hunting, extreme hunting, grizzly brown bear, hunting, Hunting Culture, Hunting with Camera, meat, nature, public land, Videographer, wildlife

Here is part 1/2 from a 2016 late season sitka blacktail hunt on Kodiak Island, AK


First Moose: Jordan’s Bull

alaska, camping, DIY hunting, hunting, moose

This is Jordan’s first Alaskan big game harvest, she lucked out with the moose of a lifetime.  Join along with the crew on an unforgettable float hunt in remote Alaska.

Blacktail Deer Hunting: Public Land Blacktails on Oregon’s Pacific Coast Part 2

antler hunting, archery hunting, arrows, big game hunting, Blacktail Deer, bow and arrows, Deer Hunting, DIY hunting, hunting, meat, public land, shed hunting, The next generation, traditional archery


Oregon_Hunting_Access_Map_buttonPublic land is great choice for any DIY hunter, its widely available you just have to know where to look.  Surveying Google Maps on my computer I saw an interesting national forest near Oregon’s coast and wanted to check it out.  Choosing a few hunting locations in the Suislaw National Forest is a daunting task, it stretches for 991miles across the Pacific coast line of Oregon and provides ample hunting opportunity.  “If you have never hunted this particular area how do you chose a location?” Firstly I read some information on blacktails provided by Oregon Department of Fish and Game, and checked out their Interactive hunting map. Secondly, I concentrated my efforts on one particular area on a system of clear cuts, using one specific road.

Screen Shot 2014-12-17 at 11.55.58 AMI also studied the game regulations provided by ODFG and found the particular GMU’s which I was allowed to hunt. I decided to hunt National Forest because it is the easiest way to find yourself in a legal hunting area if you are a DIY public land hunter and have a tag in your pocket.  Reading everything I possibly could online about blacktail hunting, I learned that hunters have mixed success from tree stand hunting, still hunting, and spot and stalk techniques.  Hunting the edge of clear cuts whenever possible also provides hunters with success.  These tactics aren’t to much different from the way whitetails are pursued, although the terrain, diet, and behaviors of the blacktails are slightly different.  I find that trees and forage are the key to any deer species, and having an understanding of the trees helps hone my hunting approach.  I found myself studying trees more during the hunting season than studying deer, mainly because I couldn’t find any blacktails.

Screen Shot 2014-12-17 at 9.18.31 AM

Using my iPhone maps app I drive to the selected national forest road a few miles outside a small surf town on the coast of Oregon.  One man can only cover so much terrain on one hunt, and from what I have read/heard it’s not to easy to walk up on the said “ghost of the coast”.   Drawing on previous experience from my 2013 blacktail hunt where I harvested a beautiful blacktail doe, I knew one particular tactic that would give me a great place to start.  I got to the road where I was legal to hunt and started looking, slowly driving to find animal “highways” that cross the road.  I took the first day to scout/hunt keeping my eyes open for any deer sign possible.  I had one tree stand in my tool kit to hang, thus adding to my strategy for these blacktails.  Kind of mind numbing to think that your hunting 991 square miles sitting in a tree waiting for one deer to show up though.  I like my odds…..  Finding a concealed blocked off logging road, I march a mile or so deep finding rubs and deer sign the whole way.  I hung my stand and took off to search for more sign in the area not limiting myself to only one option.

Screen Shot 2014-12-17 at 9.17.50 AM

Finding another meadow bound by a clear cut and a stream, there was an animal highway dividing the lands features.  I knew I had found my secondary hunting location.  There was a large stump over turned with a ball of dirt and tree roots in which I could sit approximately 8-10 feet off the ground perched perfectly for a 5-10 yard shot.  If I sat at either location long enough I may just have a shot at a buck.   Not seeing an animal in my new “spot” for the first few days, I was starting to get a little discouraged.

Sitting on the up-turned stump for the morning with no action, I decided to visit the tree stand.  Again to no avail, I pound out the hours in the stand answering emails, Face-booking, Instagraming, and tweeting(guilty)…. The second day hunting was once again a total bust, there were deer tracks under both of my stand locations but no deer.  It appeared as if they were coming through both of my trails at dark.   Based upon the winds direction I decided on the third day that I would sit on-top the stump for the morning hunt and hit my tree stand for the afternoon hunt.  At 10:30 am the wind changed for the worse and rendered both of my hunting locations null.  Thinking fast I walk back to the car and drove to a small clear cut I had previously book marked for a two hour hiking appointment.   Having just enough time for a short stalk and spot hunt, I followed my instinct and decided to hunt the closest possible public land bordering private land.  The game plan was to rattle and grunt with the wind in my face working my way to a forked forest road, then walk my way back to the car.  Luckily my 3G was working and gave me a pinpoint location of where I was relative to my vehicle, the private land, and the public land.  Without having to fuss with any other GPS the iPhone was a great tool for the hunt, this allowed me to distinguish exactly where the private and public land boundaries were; a beneficial tool to the 21st century hunter.

Screen Shot 2014-12-17 at 9.18.14 AM

There was as small road closed to all motor and atv vehicles, a great place to go with minimal if any foot traffic.  The terrain consisted of rolling hills lined with douglas fir, the western hemlock, and small stands of big leaf maples.  I headed up the steepest hill to find a few small rolling benches protected from the wind, the perfect location to rattle in a bedded buck.   Calling to me is like painting a picture, the first step is to set up and begin the rattling sequence after a 5-10 minute silent pause.  Light tickling of the antlers works to coax a closer buck, after 10-15 minutes the rattling will increase intensity crescendoing into a couple of bucks locked for the title of alpha buck and breeding rights.  Rubbing the antlers on trees, scraping the ground, raking tree bark, simultaneously grunting, and doe bleating these all work.  In this instance, nothing came to my beautifully painted buck fight in forest surrounded by red cedar trees amongst the tangles of a recently thinned clear cut.  I continued to paint the entire clear cut as if there was a battle royal of the biggest bucks in the area all throwing down for the hootenanny. Nothing.  Nothing came to the rattle, maybe I’m like a finger paint artist or something….

Working my way towards the opposing forest road, I let down my guard and begin to march toward the “pin dropped” location on my google maps app on the smart phone.  Looking at my phone I have a pretty good barring of which direction to walk, I crammed the phone in my pocket and zipped it.  Realizing the “pin dropped” location was further than anticipated, I knew I had a extra mile or so to the car and needed to get back to town for lunch plans.    Better pick up the pace, I think to myself.  I moved as swift and safe as possible through the douglas fir stand which I was currently hunting, the area was loaded with heavy blown downs mixed with a luscious green fern undergrowth.

Screen Shot 2014-12-17 at 9.19.50 AM

Continued from PART 1:

Trotting through the woods, I notice a buck springing from his bed and take two bounds pausing at 20 yards.   I immediately freeze, the buck does the same and keeps a tree between us peering with on eye around the tree focused on the direction I came from.   I was caught off guard for two reasons, I was moving quickly to get back to my vehicle and wasn’t prepared to draw my long bow as movement would surely make the buck flee.

As the first buck stopped, my eyes caught movement and gravitated toward a second blacktail buck trailing his buddy at 15 yards.  As luck would have it, I was perfectly downwind with a steady sea breeze coming from the Pacific Ocean.  We all stood for about 1-2 minutes silently, it was very fascinating to watch these animals undisturbed in their natural environment. At 20 yards I watched how much they check the wind with a simple nose lift, or how they’re ears spin almost 360 degrees detecting the slightest branch breaking or noise in the forest. They could not smell me and could not detect the ensuing danger, they went back to feeding unaware of (me) the predators existence.  Calmly the second buck started to walk away after he lost curiosity in the movement he had detected earlier.  Just as he started to move and turn his back toward me I grab my grunt and softly grunted to him, he turns and immediately starts to walk directly at me.  He paused at 12 yards facing me, positioned to walk behind thick brush and offer no shot opportunity I had to think quickly to turn him broad side.  Thinking to myself, “this dudes neck is all swolled up he must be in the rut” and “I thought blacktails were smaller than whitetails?” and “This buck is a brute forky!”.  Having a set of rattling antlers around my neck I simply lean forward and barley roll my shoulders resulting in a soft antler tickle. The buck couldn’t help himself and walked 4 yards closer to find the source of the antler rattle.  Turning broad side at 8 yards he started to walk around a fallen tree, he caught my elbows movement as I anchored at full draw and then paused for a fatal moment.  The arrow disappeared from sight in the blink of an eye and the buck took off running towards the other deer.   They vanished in a fraction of a second, I crept quickly to the location of where the deer was standing when I shot him.  Looking for signs of blood, hair, and or the arrow I found something quite peculiar.

When I first saw this buck I saw that his antler was deformed, his antler hung downward on his face but still fully intact and attached to his pedicle.  With the stick bow, you shouldn’t be a choosy hunter and the old saying stays true “don’t pass on the first day what you wouldn’t pass on the last day”.  Knowing that any antlered buck in the GMU I was hunting is legal, I decided either of the bucks were in trouble if they showed me their vitals.  When this buck turned broad side at 8 yards I had no doubt in my mind wether to come to full draw or not.   After releasing the arrow and arriving at the location of the where the deer stood, I surveyed the area to find something odd on the ground.  Upon closer examination I found that this wasn’t simply a drop of blood on the ground but that this was the actual antler of my deer.  He somehow managed to break off the remaining portion of bone connecting his antler by catching it on a tree while he was on his death run.   Shortly after I found the antler, the arrow appeared buried and covered in blood in a small brush pile.

Screen Shot 2014-12-17 at 9.24.11 AM

Waiting for an hour or so before tracking the animal, I decided it was best not to move a muscle and continue to look for a blood trail in the immediate area until I had given the animal some time to expire.   Experienced archery hunters and hunters in general will tell you the most gut wrenching exhilarating portion of the hunt doesn’t come before the shot, it comes after.   The anxiety that comes with tracking a wounded animal is intense to say the least, and that anxiety was building in my mind as I had no real blood to track.   Staying close to the area where I found my arrow and the antler, I began marking the direction the bucks had run off to with florescent flagging tape.  Taking a very slow approach in their direction, as to not spook the deer from his first bedding after the shot, I spotted one of the bucks working his way directly towards me.  The buck was following the same path he left upon an hour or so earlier.   This is a valuable and interesting part of the story as it allowed for ample learning opportunities on how to hunt blacktail deer. This buck and other bucks I have hunted in my experience will return to an area using the same trail if they are not alerted to human presence or danger.   This deer had no clue what had happened in the forest and was curious enough to come back through an hour or so later to investigate the source of commotion in his bedroom.  He meandered off after a few minutes and headed toward the direction we all came from, although he didn’t have the droopy antlered buck with him, a good sign. Noting that one deer track was much heavier I knew the direction that the deer ran, after about 60 yards I found a pool of blood on the forest floor filled with pink bubbles and a mix of crimson clots.  Not moving another inch I survey the area for more sign in any direction, the body of the deer, or simply an upturned hoof signaling the end of the hunt.

With no blood sign detected in any other direction, I started to let my eyes do the walking and survey further out for a possible lead. It was then that I noticed the deers body laying 40 yards away.  I knock an arrow and take off my boots and pack to sneak within 20 yards for another shot if necessary.  I dropped to a knee slowly and paused at stick bow range, there was no need for cou-de-gra.   I walked up, gently pet his hide and thanked him for the bounty he would provide.  Growing up Alaskan, going to undergrad school in Pennslyvania, and filming professional for living I’ve had my fair share of rifle harvested sitka blacktails, eastern whitetails, and central mule deer.  However, this is my first Columbian blacktail buck with traditional archery equipment and any animal harvested with true stick and string in my book is a trophy.   Completely throttled from the magical experience, a large wave of adrenalin coursed throughout my veins.  I had to sit down for a moment, calm my excitement, and fully embrace the situation before the work really began.  Its these moments that are seared into my mind after a successful hunt, savoring the nostalgia of the effort placed in the adventure. “I feel special that I’m allowed to sit in national forest sandwiched by the Pacific Ocean and woods filled with douglas-fir, western hemlocks, western red cedar, sitka spruce, big-leafed maples, and red alders with a deer tag and my longbow.”  After a few moments of savoring the successful hunt a long drag back to the National Forest Road awaited me, it wasn’t long before the processing of the animal begun.

Screen Shot 2014-12-15 at 6.14.49 PM

The final process for this hunt took me firstly to a buddies house to slice, dice, grind, and vacuum seal my delectable winter table fair; honor this animal by salvaging as much edible meat possible.  Once the buck was completely processed and in the freezer, including a self european taxidermy job, I was off to the Oregon Department of Fish and Game office to submit a tooth sample and report my hunt online to validate my harvest.  The ODFG here in Oregon does a great job on the fascination deer population found through out the states many GMU’s.   Hunters do their part in conservation by purchasing game tags and hunting licenses, which in part, provides funding for biologists and conservation officers to regulate and control game diversities throughout the state.  By hunters submitting tooth samples to this agency, the biologist can gather data on age, sex, distribution ranges, etc and then compile these facts to better understand the game species overall abundance and carrying capacity for certain areas.  Without hunters and their ability to communicate game numbers and data with Departments such as ODFG, these agencies would not have the best information to pull from to set correct game limits and regulations involving certain species.  These relationships are crucial to the continued success of wild game populations in North America.  I am proud to say I’m a hunter and conservationist.

Screen Shot 2014-12-10 at 9.18.15 PM

For more information on a DIY public land Blacktail hunting hunt check out http://www.dfw.state.or.us

For more information on how to become a hunter or if you have interest in the hunting movement we highly encourage you to check out your local Department of Fish and Game and ask about The Hunters Saftey Education Course offered year round.

Here is a link to Oregon’s Hunter Education Programs

http://www.dfw.state.or.us/education/hunter/

Non-resident tag:$383.50

Non-resident hunting license: $140


Blacktail Deer: Oregon’s Ghost of the Coast Part 1

archery hunting, arrows, Deer Hunting, DIY hunting, game processing, hunting, nature, public land, The next generation, traditional archery, unguided hunting

Screen Shot 2014-12-15 at 10.04.35 AM Trotting through the woods, I notice a buck springing from his bed and take two bounds pausing at 20 yards.   I immediately freeze, the buck does the same and keeps a tree between us peering with on eye around the tree focused on the direction I came from.   I was caught off guard for two reasons, I was moving quickly to get back to my vehicle and wasn’t prepared to draw my long bow as movement would surely make the buck flee….. Ghosts of the coasts they have been called by many hunters who have been fortunate enough to roam the lands with these creatures.  They have this nick name for a reason, they live in the thickest forests of North America and are rarely seen. Screen Shot 2014-12-15 at 6.15.13 PM The plan for the Oregon archery tag was to meet up with a hunting buddy and head to a few key areas in Mount Hood National Forest.  Hopefully one of us would score a buck for the late season effort. Screen Shot 2014-12-17 at 9.19.10 AM My buddy takes me to a few of his hunting spots and we attempt to rattle in the infamous bench buck.  Apparently bench deer are a result of blacktail and mule deer crossing and creating a hybridized specimen.  Mule deer are said to have evolved from whitetails and blacktails breeding thousands of years ago, genetics aside deer species in Oregon are diverse.  Wether or not these animals are mule or blacktail deer or a cross of both, they are interesting and fun all the same to hunt with traditional archery equipment.  These animals live in a diverse ecosystem, the forest covers steep hills with rolling benches the perfect hiding place for a buck. Screen Shot 2014-12-17 at 9.20.01 AM We spend many mornings chasing these elusive critters, rising at 3am and driving 3 hours to hunt first light. Screen Shot 2014-12-17 at 9.17.25 AM Only seeing two deer crossing a highway providing no shot opportunity, the late season archery tag was going to be a tough one to notch.  Sometimes switching up tactics is your only shot at success.  I knew I needed to go to another area but choosing one hunting spot is tough especially if you don’t have land owner relationships with private land access conveniently located near town.  Fortunately Oregon has plenty of public land to cover within a 2-3 hour drive, refer to the ODFG maps for more information. Continued…..

Mission: WA Blacktail

Blacktail Deer, Deer Hunting, DIY hunting, hunting, Washington State

One of the many reasons I love deer hunting is encountering and observing the various deer species that inhabit North America. Each has specifically adapted to live in it’s respective environment and offers different hunting challenges. As I have traveled and moved across the country, I have had the chance to hunt whitetail and mule deer, but never the elusive blacktail. Ever since I moved to western Washington State, I wanted to hunt the blacktail deer, also known as, the “Ghost of the Coast”. These smaller deer species live secluded lives surrounded in the thick pacific northwest rainforest. They move like shadows through tangles of moss covered forrest amidst torrential rains. Hunting these “ghosts” will challenge any deer hunter unlike any whitetail or mule deer.

Thick NW Rainforest

Thick NW Rainforest

During my 3 year quest to hunt blacktails, I have bushwhacked through thick rainforest and climbed cliffs on National Forrest to no avail. As any modern hunter, I am always on the lookout for private land to be allowed to hunt on. After reaching out to friends and family, Kristy’s mom knew someone who said we could hunt on her property on Whidbey Island, Washington. We connected with her and instantly became friends. She had no problem with us taking a deer and sees them all the time.

Whidbey Island is 2 hours outside of Seattle, in the Puget Sound. The island is mostly rural and agricultural consisting of small farms, orchards, and large gardens. It is prime deer habitat with tons of blacktail deer. Almost every other day there is a car accident on the island and the state allows any deer to be taken during the season. The hardest part about hunting Whidbey is gaining access to land to hunt. There are a lot of people who live on the island that see the deer as pets, and don’t understand or want hunting. Due to the closer population density, there is a firearm restriction on Whidbey as well. It is bow and/or shotgun only. I have never hunted deer with a shotgun, but this was going to be my first hunt with buck shot.

We went out one week before the season opened to scout the property and set up a game camera. We saw a lot of deer sign and set the camera up at the intersection of 2 well used deer trails. All that week the anticipation was building.

I was anxious about using buck shot and wondering if I was going to wound the deer or ruin a lot of good meat. None the less, it was my only option and the hunt was on. I went out to sight in my shotgun and practice with the buckshot. The gun worked great, but I knew I was going to have to be within 40 yards for the buck shot to be effective. I just had to get close. While I was out practicing, I also harvested 2 pounds of Chanterelle mushrooms! I took it as a good omen for the blacktail harvest to come.

Chanterelle Mushrooms

Chanterelle Mushrooms

With the gun sighted and the tags purchased, we loaded up the car and took the ferry to Whidbey Island.

Deer Tag and Hunting Regulations for Washington State.

Deer Tag and Hunting Regulations for Washington State.

When we checked the trail camera, we saw pictures of some does and one nice buck that had been moving through the area. We noticed that they were moving mostly in the evening and walking very close to the camera. While it is any deer on Whidbey Island, we wanted to go after the buck that we had seen pictures of.

Blacktail buck on the the trail camera.

Blacktail buck on the the trail camera.

We set up our chairs tucked away in the brush, right where the camera was. We sat that opening morning and didn’t see anything. We walked the woods that afternoon and saw tons more sign, but no deer. That evening we went out anticipating to have an encounter based off the time of our trail cam shots.

Kristy and IKristy and I Heading Out to Hunt

Kristy and I Heading Out to Hunt

All evening we sat, waiting and waiting, quickly loosing light and seeing nothing. Kristy asked if I could still see and I assured her I could, knowing we only had about 10 more minutes. Right after she asked that question the buck silently appeared out of the thick moss covered rainforest, no more than 5 yards away from us. I stealthily tried to get the safety off but he instantly saw me. With the blacktail buck staring down on us, we were locked in a stare down for 2 minutes. He eventually decided he didn’t like the situation and walked back into the jungle. My heart immediately sank as I thought it was over. Then, I saw him moving through the brush behind us and could tell he wasn’t spooked. He wanted to come back. I readied my gun and sure enough a minute later he came back. This time ready, he saw nothing as he inspected us over. He kept moving out but not presenting a good broad side shot. Then, at 15 yards, he turned and I immediately saw my opportunity. One shot and he was down. No running or kicking, he just quietly and quickly died right there. The buck shot performed.

Blacktail Buck Down

Blacktail Buck Down

Kristy and I were shaking. Both of us had never had a deer encounter that close in the open, much less a buck, and an elusive blacktail! On top of that, it was a roller coaster of emotion as he saw us and left, but then came back again. It was an amazing experience that neither of us will ever forget.

Kristy and I with the Blacktail Buck

Kristy and I with the Blacktail Buck

We field dressed him, loaded it up, and caught the late ferry home. The next day we processed the meat into steaks, burger and sausage. We vacuum sealed it and put it in the freezer for winter…after cooking up fresh venison inside tenderloin of course.

Blacktail Venison Backstrap

Blacktail Venison Backstrap

-Jon Dykes

@realjondykes


8 tips for DIY Alaskan Moose Hunting

alaska, alaska hunting expedition, antler, antler hunting, archery hunting, big game hunting, hunting, Hunting Culture, meat, moose, unguided hunting, wild game

IMG_8116

  1. Game plan:

Need to make a good game plan with solid logistics and stick to it. Maps are critical to success, understanding game regulations and the area you are hunting are first priorities.  The Alaska Department of Fish and Game (http://www.adfg.alaska.gov/index.cfm?adfg=hunting.main) home website provides great information on where to start and how to finish a successful moose hunt.   This can help answer many of the initial questions someone has concerning a DIY Alaskan moose hunt, this should be the first place to start when coming up with a moose hunting game plan.  You can find things like harvest statistics for your selected hunting area and animal information, hunting license and tags, pictures on how to field judge a moose, and most importantly all the regulations controlling your hunt.

Screen Shot 2014-10-16 at 4.40.18 PM

  1. Pre/ in-season scouting: internet research – fly over – ground visit

The digital age is upon us and information is more available now than ever.  Internet databases such as outdoor forum directories and www.rokslide.com make scouting a little easier.  Some individuals like to fly into a hunting area and scout on the way, although there is rules that prevent hunters to chase animals the same day they are airborne.  With no pre-season scouting for the majority of hunters out there, they must rely on putting boots on the ground and looking for the freshest moose sign possible.  Printed maps of your area is instrumental for moose hunting.  Know your area and how to move from point A to B (or at least have a game plan for it).

  1. Vantage point glassing

If you don’t have the option of scouting the area you will be hunting and have not targeted any particular bulls then gaining a vantage point to glass your hunting area is key.  One technique used by saged Alaskan moose hunters is to hike the closest hill then climb a tree, allowing them to survey their hunting area. Climb a spruce tree or cottonwood or use techniques such as climbing a telescoping ladder to get above brushy swamps. Hiking above tree-line in the mountains and letting your optics do the walking for you increases your chances to see animals as well.  In general visibility diminishes at lower elevations and gaining a vantage point could be your saving grace.

Screen Shot 2014-10-16 at 4.30.39 PM

4.Wind direction

Always plan morning and evening hunts around wind direction. Moose (even rutting bulls) will usually circle 100-900 hundreds yards down wind before closing the distance.  This early season archery bull circled 100-200 yards down wind before bedding permanently this 2014.

IMG_3643IMG_3633

IMG_3641


  1. Calling – antler raking

Antler raking or scraping is great for moose hunting because not a high level of skill or knowledge of the moose language is needed.  Simply breaking and scraping spruce tree branches can be enough. Listening for a response to your call is crucial.  Sometimes bulls approach silent, other times they will rake their antlers and/or grunt.  An old moose shoulder blade, plastic oil container, milk jug, protein jug, commercialized fiberglass calls, birch tree bark scrapers, they all work to some degree.  The last moose hunt I went on we made a moose scraper out of a jug of Muscle Milk protein and called in a dandy bull fit for the freezer.

Screen Shot 2014-10-20 at 11.53.16 AM


  1. Be prepared to sleep out: survival kit essentials

You can add more items to this list, but I wouldn’t subtract any of these items or be caught dead in the field without them.  Moose are just like any of the other member of the deer family, they move most at first light and last light depending on the photo period and rut phase.  Knocking down a moose at last light can lead to a long evening away from the shelter of base camp, if you leave your survival kit you’ll be wishing you had one.  If your not prepared to siwash* then your not prepared to harvest a bull moose.

Survival kit – bare minimum

  • flagging tape
  • rope
  • sleeping bag (emergency blanket, and/or bivy sack,etc)
  • two sources of ignition(bic lighter, magnesium fire starter, etc…)
  • small fold out saw
  • a knife
  • 8×12 tarp (or bigger)
  • emergency rations of food (cliffs bars, beef Jerky, etc)
  • compass and GPS

IMG_3761 2

  1. Correct gear: a few guidelines

Gear selection can make or break a hunt, rough weather and terrain are inevitable on an Alaskan adventure.  Your gear will experience some wear and tear, no doubt. GEAR: Hunting methods differ and depend on the individual hunter but here are a few guidelines for equipment.  A heavier rifle caliber capable to shoot 200+ grained bullets out to 300 yards should do the trick. Quality binoculars 8x32s work great, these help hunters field judge moose on those late evening sits in low light conditions.  Tent camp with the option to spike camp(1x bigger and 1x smaller tent ), sleeping bag and pads for everyone(0 degree rating mummy bags), and one action packer(tote or cooler) filled with a camp kitchen. An 8×12 (or larger) tarp works great to keep rain off your meat and doubles as a clean surface to help in field processing.  A small fold out saw is nice to have along for splitting the sternum, removing antlers, limbs, and gathering firewood.  A minimum of eight game bags should be brought, I like to bring 16 in case we drop another moose and/or need to change the game bags in the field if they get wet or dirty. Bring a big enough back pack or packing frame to fit 80-150 pound hind quarters/shoulders in it, day packs simply will not suffice. Cordage, you need much more rope than you think. Extra rope of all sizes along with a giant role of B-50 cord will really help you out in the long run, especially if your buddies aren’t their to lift those heavy moose quarters.  An old guide trick I learned a while back was to tie a moose leg with B-50 cord to the closest tree limb you can find, this relieves pressure on the hunter to hold the leg, the knife, and then make the cut.  Much more could be said about the correct gear needed for a moose hunt, this all circles back your game plan and methods for transportation to get you in and out of the field.

Moose Load

  1. Mental and physical toughness:

Moose hunting is tough, one must be mentally and physically ready to handle the task at hand.  Once you knock down a moose the “fun is over”, after getting some beautiful trophy shots the slicing and dicing begins.   It will take an average hunter about 3-8 hrs to field dress/quarter a moose in preparation for the pack out.   Rule of thumb in Alaska is to not shoot a moose more than one mile away from your transportation; this is where physical toughness and mental toughness play a huge role. There are many bulls that go noticed yet untouched because hunters don’t want to deal with all the work, the big boys are out there you may just have to work harder than you bargained for.  That being said, there are even bigger bulls that go unnoticed and untouched you just have to be semi-insane to go after them.  This bull (pictured lower left) was a few miles past a public hiking trail. It took five days of meat packing up and over 2,500ft mountains to get this moose in the freezer, hands down one of the most grueling pack outs I have personally been apart of.

A back-country pack after a successful harvest


Take these tips with a grain of salt. There are many seasoned moose hunters out there that have come home and filled their freezers using different tactics. Point is, you can’t kill them from the couch… Do your research and get out there!

Hit hard,

AM

*Siwash: verb – camp without a tent.


Moose with Alaska logo on it

Austin with Vince(aka”Moose Sensei”) and their 2013 Alaskan bull.


Venison Summer Brats: Just in “Thyme” for Independence Day

Butchering, Field Producer, game processing, hunting, Hunting Culture, meat, Sausage Making, The next generation, traditional archery, wild game, wildlife

Summer is here and on these warm beautiful days, I immediately think of brats on the grill. I know warmer days are coming soon and with Independence Day just around the corner, I started to make some venison sausages with ingredients that needed to be harvested from the garden.

Ready For The Grinder

Ready For The Grinder

Grind #1

Grind #1

Fresh Herbs From The Garden

Fresh Herbs From The Garden

Thyme, Hot & Spicy Oregano, Parsley

Thyme, Hot & Spicy Oregano, Parsley

The Final Blend

The Final Blend

Casing is Ready

Casing is Ready

Finished Sausage

Finished Sausage


Ready For The Grill

Ready For The Grill

– Jon Dykes

@realjondykes

Enjoy your venison….

“Happy Independence Day America”!

http://en.wikipedia.org/wiki/Independence_Day_(United_States)

July 4th, 1776, the day we adopted the Declaration of Independence declaring independence from the Kingdom of Great Britain.

British Columbia Winter Kootenay Billy Hunt

big game hunting, Camera, camping, DIY hunting, extreme hunting, game processing, guns, hunting, Hunting Culture, meat, nature, Rifles, Survival, unguided hunting, wildlife

On a recent hunt in British Columbia I met several of the most elite big game hunting guides you can find across the globe, the following article tracks the personal adventure of one of these world famous guides on a quest to harvest a BC mountain billy goat.  While I was filming at Sean Lingl’s Canadian Guide Outfitters I was introduced to Aaron Parrotta, he was guiding another group of hunters in camp so we did not get to personally hunt with him.   Although we didn’t get to spend time in the field with Aaron we did manage to find some time at the lodge to share stories and build friendships.   Aaron, along with all of Sean Lingls guides, are very talented at finding trophy class animals for clients year round.  When the guides do manage to find some time to hunt in the field for themselves, trophy class animals pushing Boone and Crocket measurements are the standard.

The following article was written by Aaron and chronicles his personal adventures of chasing white ghosts with black horns in the Kootenay’s of Britsh Columbia.  It’s getting closer to big game hunting season, so here is a mountain goat hunt to pump up all the red meat enthusiasts out there.   Enjoy!

PB160354


Screen Shot 2014-06-20 at 12.37.26 PM

PB160349


Screen Shot 2014-06-20 at 12.37.58 PM

PB160444

PB160359